
Symbl.ai is a general purpose, domain agnostic, cross channel Conversation Intelligence API platform that works for obtaining transcripts, analyzing contextual insights in multi-channel conversations, in streaming voice, video, message or broadcast real-time contexts. With Symbl.ai developers are empowered to transform those channels digitally with the introduction of new layers of continuously deployed Artificial Intelligence models built to drive real-time engagement.
Symbl.ai operates with CPaaS platforms like Telnyx like a hand in a glove. Symbl.ai’s Conversation Intelligence API platform extends the functionality of CPaaS platforms like Telnyx to encompass features that go beyond mere transcription to programmed artificial intelligence. Symbl.ai’s APIs empower you to analyze recorded calls for questions, follow-ups, action-items, topics, or sentiments on messages.
In the following blog you create a recorded call with Telnyx’s Voice API. After creating a recorded call with Telnyx, you analyze the conversation data from the Telnyx recorded call for sentiment analysis.
A brief overview is the following:
- Create a webhook server.
- Configure your new Telnyx developer account to initiate a recorded call with two cURL commands.
- Configure your new Symbl.ai developer account to analyze that recorded call for sentiments with cURL commands.
Webhooks
Webhooks are a great way to receive real-time updates through the HTTP protocol. To receive real-time updates on your HTTP requests through cURLwith Telnyx, you create a webhook server. To create a web hook server, navigate to https://webhook.site/. At the site there is a line that says, “Your unique URL.” Next to the name is an option to copy the link. Copy the link.
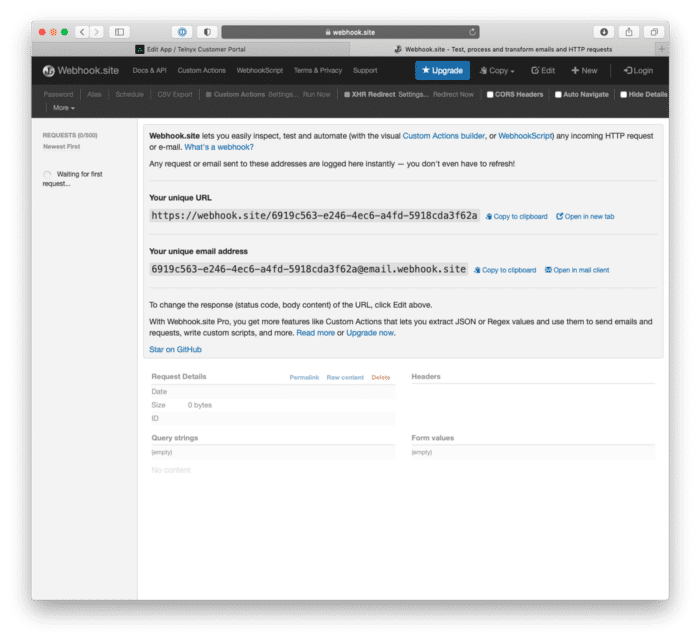
You need your unique URL to set up your webhook server to receive real-time updates on the Telnyx Voice API number you select for initiating the Telnyx Voice API call.
Telnyx
Telnyx is a real-time communications platform with full, feature-rich voice functionalities, making it quick and easy to set up and port numbers around the world, configure messaging, control VoIP and IP network functions, and define how and where communications can be used in real time. The Telnyx API can power a host of specialty applications, from call tracking to cloud-based PBX, dynamic security, and authentication use cases.
Telnyx Voice APIs
Telnyx’s Voice APIs provide you as a developer with access to recorded calls through a single API call.
Steps
To analyze a recorded call with Telnyx, you set up your Voice API configuration with Telnyx’s Call Control within the Telnyx Portal. Just follow these simple steps:
- Sign up for a Telnyx account.
- Create an application to configure how you connect your calls.
- Buy or port a phone number to receive inbound calls, and assign this number to your new application.
- Create an outbound voice profile to make outbound calls, and assign your application to this new profile.
- Record the call
- Generate a Public URL for recorded calls
These steps are summarized on Telnyx’s quickstart guide.
Portal Signup
Let’s begin with the easiest step of all. Head to the signup page to sign up for your free Telnyx account. It’ll give you access to our Mission Control Portal, where you can buy numbers, set up and manage connections and a lot more. The first step is to search and purchase a Telnyx Voice API number.
Search and Purchase
After clinking on numbers, you are provided with the ability to search and buy a number:
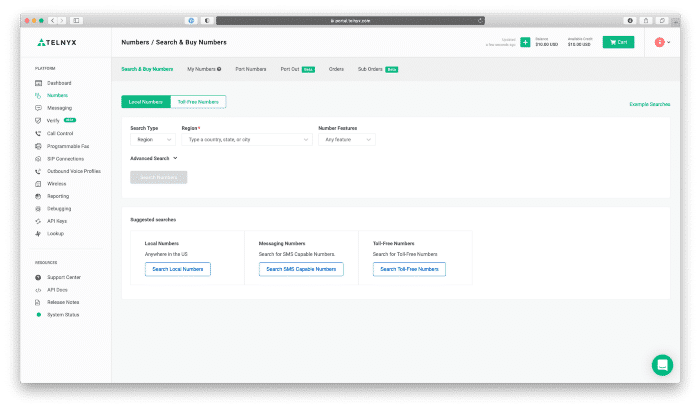
After selecting a number, checkout.
Editing your Call Control App
After selecting a number, you navigate to the Call Control App.
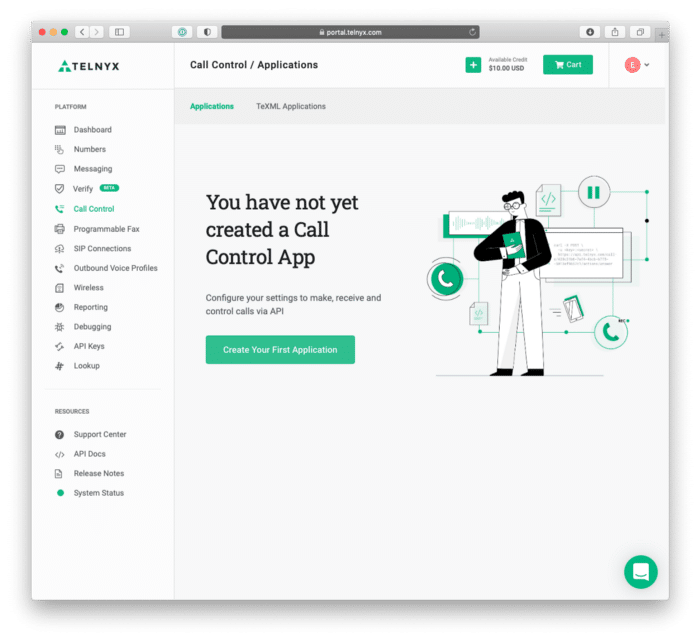
After clicking “Create Your First Application”, you edit your Call Control App.
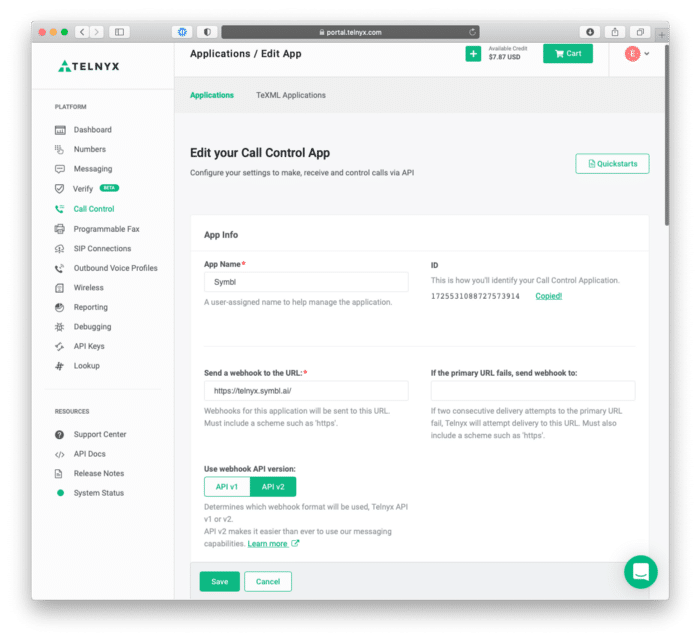
There are three steps to take in editing the Call Control App:
- Create an App Name.
- Copy of the Call Control Application number as later the number is used in a cURL command as a uuid.
- Paste the link you called your “Your unique URL.”
With those three steps out of the way, your Call Control App is ready to enable outbound calls through POST requests with cURL commands.
The First cURL Request
To initiate a Telnyx Voice API call for recording, you make the following POST request:
curl -X POST
   --header "Content-Type: application/json"
   --header "Accept: application/json"
   --header "Authorization: Bearer YOUR_API_KEY"
   --data '{"connection_id": "UUID", "to": "YOUR TELEPHONE NUMBER", "from": "YOUR TELNYX VOICE API NUMBER"}'   https://api.telnyx.com/v2/calls
As you can see above, you will need to change the variables for the following:
- YOUR_API_KEY
- YOUR_TELEPHONE_NUMBER
- YOUR_TELNYX_VOICE_API_NUMBER
- UUID
The UUID is the Call Control Application number from number 2 in the section above.
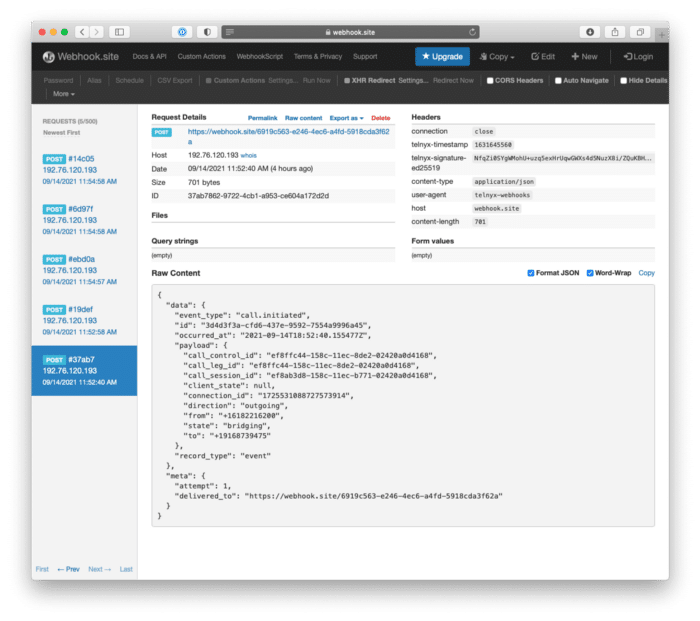
After the request successfully POSTs, the webhook server returns a POST request with return data like so:
{
   "data":{
      "event_type":"call.initiated",
      "id":"3d4d3f3a-cfd6-437e-9592-7554a9996a45",
      "occurred_at":"2021-09-14T18:52:40.155477Z",
      "payload":{
         "call_control_id":"ef8ffc44-158c-11ec-8de2-02420a0d4168",
         "call_leg_id":"ef8ffc44-158c-11ec-8de2-02420a0d4168",
         "call_session_id":"ef8ab3d8-158c-11ec-b771-02420a0d4168",
         "client_state":null,
         "connection_id":"1725531088727573914",
         "direction":"outgoing",
         "from":"+16182216200",
         "state":"bridging",
         "to":"+19168739475"
      },
      "record_type":"event"
   },
   "meta":{
      "attempt":1,
      "delivered_to":"https://webhook.site/6919c563-e246-4ec6-a4fd-5918cda3f62a"
   }
}
Here is a view from the webhook server:
The Second cURL Request
To initiate the recording for Telnyx’s Voice API call, you execute the following POST request withcURL:
curl -X POST
   --header "Content-Type: application/json"
   --header "Accept: application/json"
   --header "Authorization: Bearer YOUR_API_KEY"
   --data '{"format": "mp3", "channels": "single"}'   https://api.telnyx.com/v2/calls/{call_control_id}/actions/record_start
As you can see above, you will need to change the variables for the following:
- YOUR_API_KEY
- call_control_id
The call_control_id comes directly from the return data from the last POST request.
After the request successfully POSTs, the terminal returns the following data:
{
   "data":{
      "record_type":"recording",
      "recording_id":"c84048c4-e4cd-48f6-a94e-cf8be3fbd884",
      "result":"ok"
   }
}
The next step is to hang up the call. With the call hung up, the webhook server serves the public URL for accessing the recorded call.
Public URLs for Recorded Calls
After recording a call with Telnyx’s Voice API, you make a call with one of the call commands to expose the webhook for the public recording URL (e.g., public_recording_urls) in the call.recording.saved object.
After successfully making the call, the return data POSTs to the webhook server. Within the return data for the JSON, the recording_urls looks like the following before it is posted to the web hook:
{
   "data":{
      "event_type":"call.recording.saved",
      "id":"0ccc7b54-4df3-4bca-a65a-3da1ecc777f0",
      "occurred_at":"2018-02-02T22:25:27.521992Z",
      "payload":{
         "call_leg_id":"428c31b6-7af4-4bcb-b7f5-5013ef9657c1",
         "call_session_id":"428c31b6-abf3-3bc1-b7f4-5013ef9657c1",
         "channels":"single",
         "client_state":"aGF2ZSBhIG5pY2UgZGF5ID1d",
         "connection_id":"7267xxxxxxxxxxxxxx",
         "public_recording_urls":{
            "mp3":"http://example.com/recording.mp3",
            "wav":"http://example.com/recording.wav"
         },
         "recording_ended_at":"2018-02-02T22:25:27.521992Z",
         "recording_started_at":"2018-02-02T22:20:27.521992Z",
         "recording_urls":{
            "mp3":"http://example.com/recording.mp3",
            "wav":"http://example.com/recording.wav"
         }
      },
      "record_type":"event"
   }
}
After posting to the webhook, the recording_urls looks like the following before it is posted to the web hook:
{
   "data":{
      "event_type":"call.recording.saved",
      "id":"47ee6238-6c0d-4f49-bd46-b2b00ea42fbd",
      "occurred_at":"2021-09-14T18:54:58.177200Z",
      "payload":{
         "call_control_id":"ef8ffc44-158c-11ec-8de2-02420a0d4168",
         "call_leg_id":"ef8ffc44-158c-11ec-8de2-02420a0d4168",
         "call_session_id":"ef8ab3d8-158c-11ec-b771-02420a0d4168",
         "channels":"single",
         "client_state":null,
         "connection_id":"1725531088727573914",
         "end_time":"2021-09-14T18:54:57.517467Z",
         "format":"mp3",
         "public_recording_urls":{

         },
         "recording_ended_at":"2021-09-14T18:54:57.517467Z",
         "recording_id":"c84048c4-e4cd-48f6-a94e-cf8be3fbd884",
         "recording_started_at":"2021-09-14T18:54:38.008036Z",
         "recording_urls":{
            "mp3":"https://s3.amazonaws.com/telephony-recorder-prod/b880fcdb-d93b-46e9-9c62-2aa7c5b2eb06/2021-09-14/ef8ffc44-158c-11ec-8de2-02420a0d4168-1631645677.mp3?X-Amz-Algorithm=AWS4-HMAC-SHA256&X-Amz-Credential=AKIASDC5E2MJDPKMH7UW%2F20210914%2Fus-east-1%2Fs3%2Faws4_request&X-Amz-Date=20210914T185458Z&X-Amz-Expires=600&X-Amz-SignedHeaders=host&X-Amz-Signature=b586b5ed26263edb7fd13c7b227c094e4ee9dd45403278d6f9335ee034c4d65d"
         },
         "start_time":"2021-09-14T18:54:38.008036Z"
      },
      "record_type":"event"
   },
   "meta":{
      "attempt":1,
      "delivered_to":"https://webhook.site/6919c563-e246-4ec6-a4fd-5918cda3f62a"
   }
}
Symbl.ai requires nothing more than that URL to handle analyzing the Telnyx recorded call. The great thing about Telnyx is that Telnyx empowers developers to provide options with which to determine the file type of the recorded call hosted on the S3 bucket. In recording_urls above the file type is .mp3. Symbl.ai’s Conversation Intelligence API platform accepts .mp3files right out of the box.
Symbl.ai
Symbl.ai is a conversation intelligence API platform for developers to program the next generation of digital transformations voice, video, message or broadcast through Artificial Intelligence.
How to Sign up for a Free Account with Symbl.ai
Register for an account at Symbl (i.e., https://platform.symbl.ai/). Grab both your appId and your appSecret. With both of those you should authenticate either with a cURL command or with Postman so that you receive your x-api-key. Here is an example with cURL:
curl -k -X POST "https://api.symbl.ai/oauth2/token:generate"
      -H "accept: application/json"
      -H "Content-Type: application/json"
      -d "{ "type"": ""application""